18 June, 2021 | News

Whether you are a tiling manufacturer, remodeling firm, or interior design studio, 3D visualization software can be a game changer for your customers during the planning phase of a project.
If you’ve never used design software with your customers before, the idea of learning a professional program and implementing it across your company can be overwhelming. Perhaps you are worried about the time it takes for your associates to learn and use the software (a few tips on that here just in case), or about the cost of buying professional software and customizing it for your business.
But 3D visualization doesn’t have to be difficult. With the right tool from the right software provider, using digital apps to help your customers visualize their next remodel project is definitely within reach.
In this article, we’re going to take an in-depth look at our online design app TilePlanner, which can be integrated into your website and customized with your product catalog.
With TilePlanner, your sales associates and your customers can build full 3D models of rooms in just a few minutes and visualize them in 2D or 3D with high-quality graphics, including surface texture and glossiness of products used within the scene.
Let’s dive in to take a closer look at how it can work for your business.
One of the easiest things about TilePlanner is that it is 100% online. Integrate it on your website and in just a few clicks your associates and your customers have access to your very own branded design app.
What that means for you is that you don’t have to worry about installing the software onto multiple computers, or installing an app on company tablets and smartphones.
Your associates can access it anywhere they need. In the showroom? Of course. At a client’s home, at their own home, or even on the go? No problem. All they have to do is visit your website and open up the tool.
Each user needs to register an account (with username and password) which will let them save projects on the cloud and will let you track usage and monitor projects built within the tool.
Now, let’s take a closer look at how the app works, and how users can quickly build and visualize a custom 3D room within the tool.
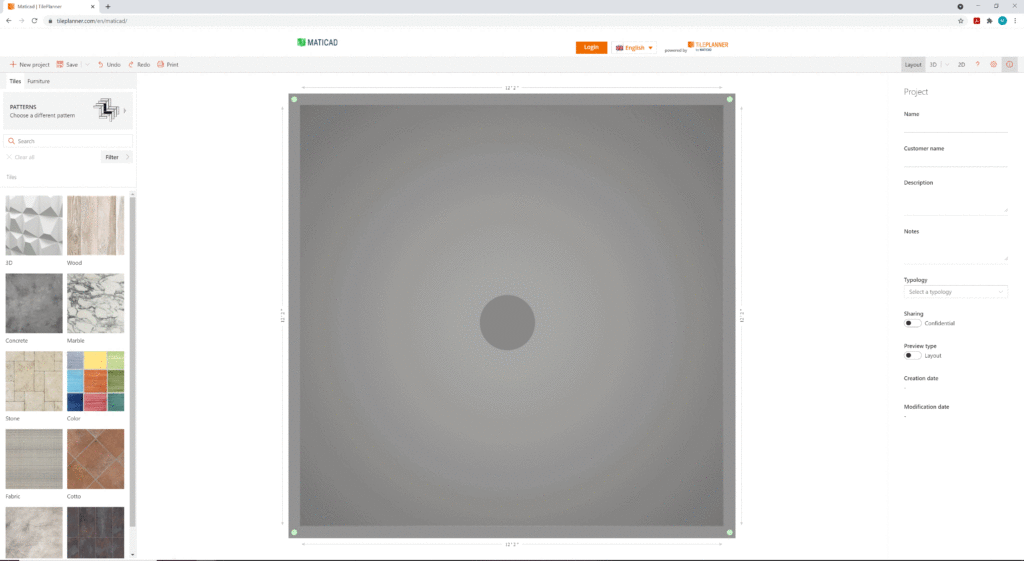
When a user clicks on “New Project”, they’ll start with an empty square room, which they can then modify however they’d like.
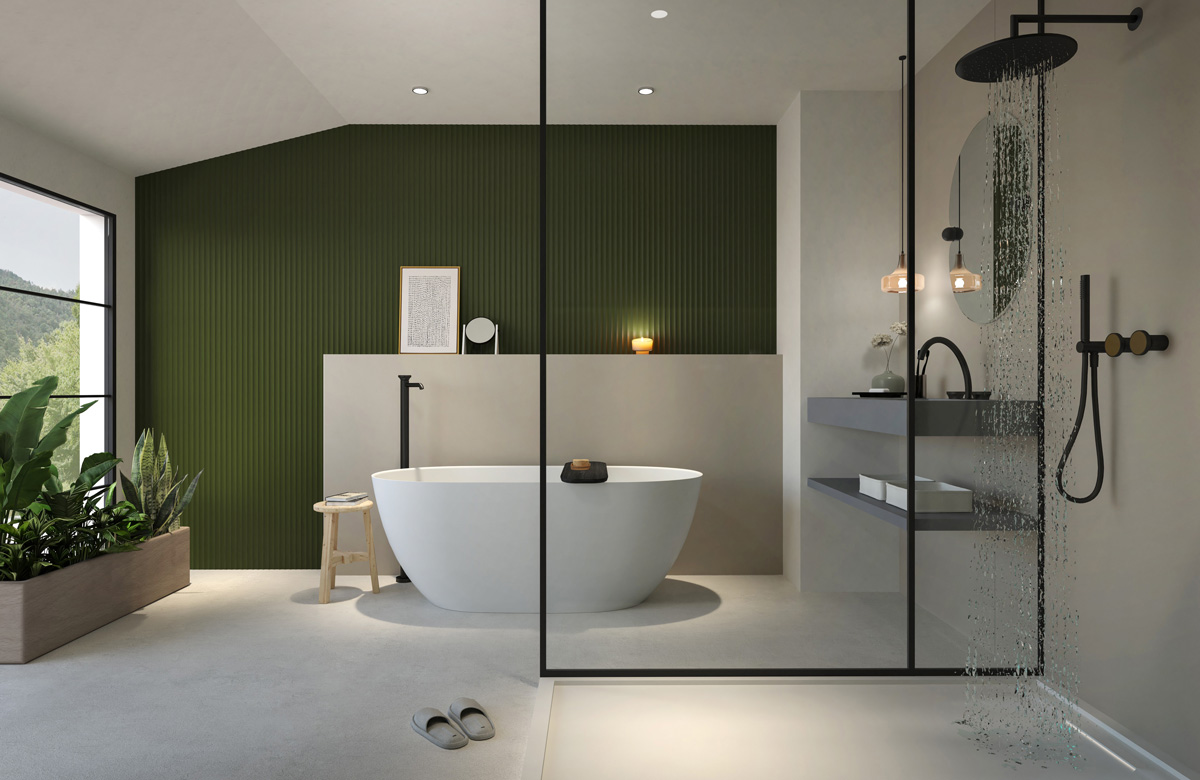
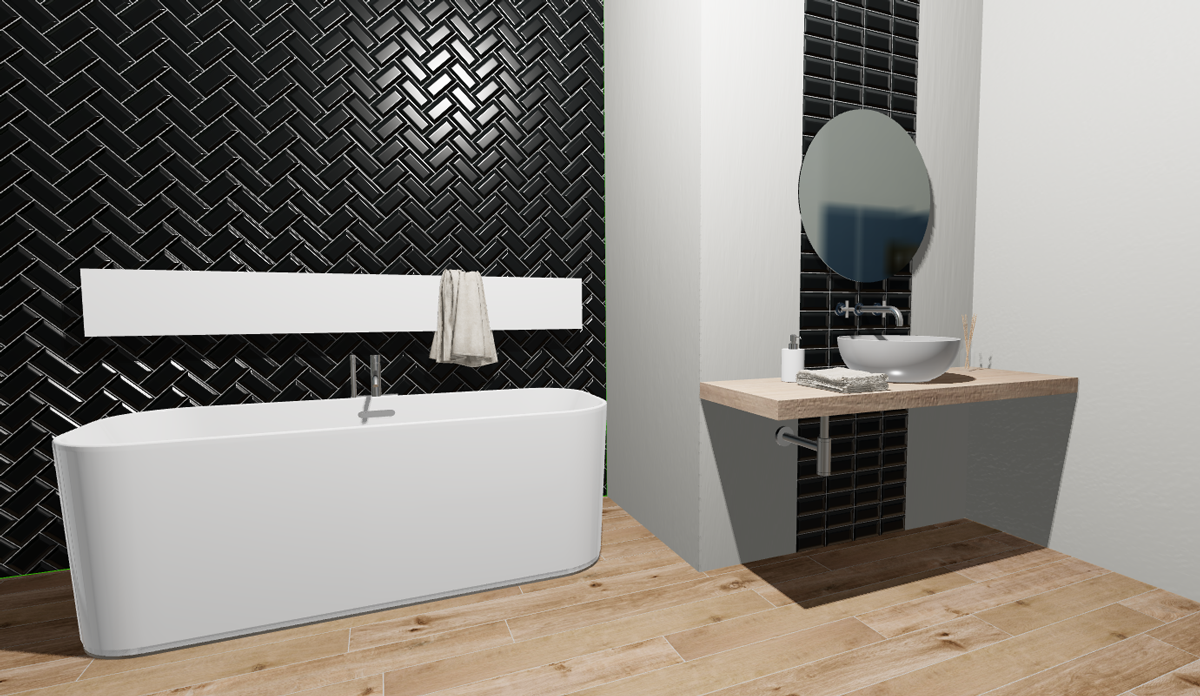
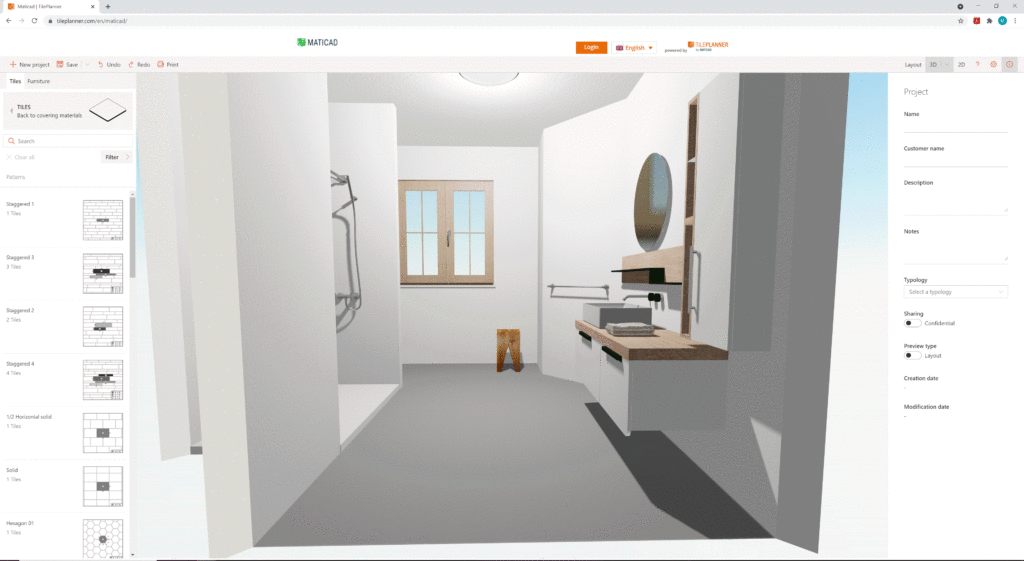
They can also open up a predesigned room, which you have the ability to build with your design team and make available to all users within the tool. This gives users the ability to see what a finished project will look like and can inspire them to build out their own design. Here’s a sneak peek of a finished room within the tool…
When a user gets started with a new project in TilePlanner, the first thing they probably want to do is set the floorplan dimensions to create an accurate representation of the room they want to visualize.
When they click on any wall in TilePlanner, they’re given three options: 1) Split wall, 2) Add inner wall, 3) Add masonry object. With these three simple options, users can recreate a wide array of floorplans in just a few minutes.
To change the length of a wall, a user simply drags the position of the wall with the mouse or clicks on its dimension and enters an exact measurement. By clicking any corner (green dot on the floorplan), users can drag it right, left, up, or down, which will make changes to the wall.
To get rid of a wall (or a section of a wall), they drag one green dot into another and it will disappear.
These quick commands let users quickly build the floorplan that they need to represent in their project.
And with the click of a button, they can see what their room will look like in 3D, as well.
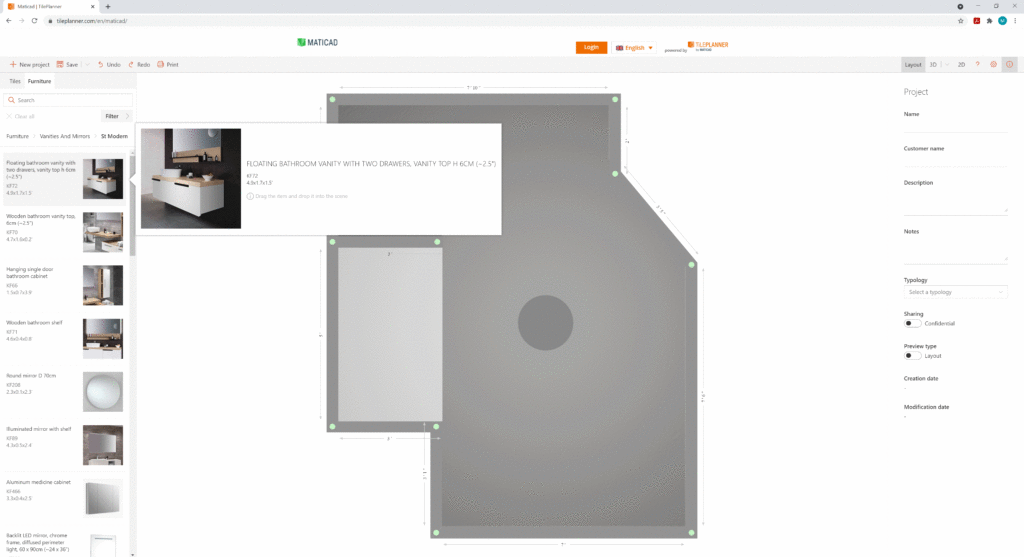
After a user sets the dimensions of a room, the next step is usually to insert furniture. This can be especially useful if a client is concerned with the spatial layout of their room or is still deciding where to place certain furniture pieces.
On the left side of the screen, you’ll see the TilePlanner digital library, where users can choose products to drag into the room. After browsing to find the item they need, users simply click on it and drag it over the project. When the mouse is released, the item will be placed in the room.
At this point, users can move it around the room, rotate it, and align it automatically on any wall.
Furniture pieces can be moved either in the overhead layout view or in the 3D view, so designers and customers alike can get the full feel for what the room will look like once it’s filled with furniture.
As you can probably tell from its name, TilePlanner was originally crafted as a tool for tiling professionals and homeowners working on their next tile installation project. As its technology has evolved, its reach has expanded far beyond tiling and into the world of interior design, configurable furniture, and more. TilePlanner is, however, one of the best online visualization tools for those that need to work on tile.
TilePlanner has a number of built-in features that make tiling really straightforward. Starting with drag and drop, all a user has to do is find the tile they want to install and drag it onto the desired surface.
And the tiling catalog is completely customizable for your company, so your designers and customers can quickly insert your products into their project, view product info, and visit your product page for more information.
If they need a specific installation pattern, like a staggered pattern on the floor, a 50% offset for subway tile, or a hexagonal pattern in the shower, TilePlanner has hundreds of preloaded multi-SKU patterns to choose from that can be applied to any surface in the project.
Again, just drag and drop, and TilePlanner does the work for you.
Need to change the grout? TilePlanner gives users full control over grout size and color. How about the positioning of the tile? Users can change that too.
And with the ability to draw specific tiling areas on the floor and walls, designers and customers can create custom installations in just a few clicks.
Plus, all of the products available in the TilePlanner digital library are curated to the smallest detail to ensure they are accurately represented within the program. With TilePlanner’s high-quality graphics, your designers and customers will even be able to see surface texture and glossiness as the light hits the material in the scene.
Your products will take center stage in TilePlanner.
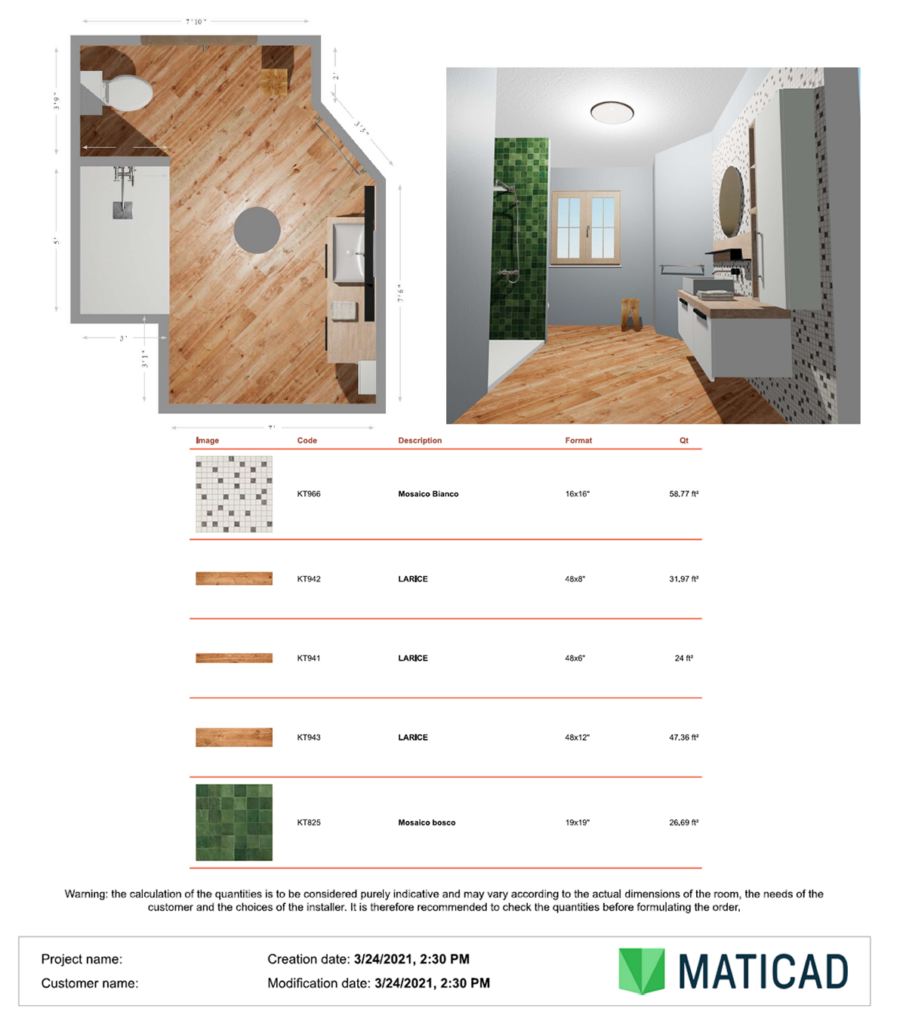
Along with being a great tool for visualization, TilePlanner also gives your customers details on their project that can be extremely useful as they move forward with buying material and starting installation. If a user clicks on “Print”, they’ll generate a project summary PDF with screenshots from the project and a list of all the products they used (and the amount of each).
These calculations can be really helpful when a customer is ready to buy material, as it’ll give them an indication of how much of a specific product is needed for a project.
For your contractors and installers, these PDF project summaries can be a great way to easily share all the information, along with a few 3D visuals, to make sure they are on the same page as the client. They’ll be amazed at the level of service you’re providing and will love the ability to see the project in 3D.
And since TilePlanner is 100% online, it’s easy to quickly share projects between customers, colleagues, friends, or anyone else involved in the project. Users just save the project to their account and can then quickly send it to another user.
They can open it up on any browser from any device and view the work. That means your designers and your customers can send a finished room to anyone they want and can quickly navigate through it to see what the finished project will look like.
No more imagining. Just easy, clear, 3D visualization.
For your designers that are looking to take their project to the next level, they can send it to DomuS3D and open it up in our professional interior design software to further refine it.
With DomuS3D, the limits a designer might have with the free online TilePlanner are gone: they can now access thousands upon thousands of products in the DomuS3D digital library, import their own tiles from a jpeg, change properties of their room or create multiple adjoining rooms, and even generate photorealistic renderings of their room.
While TilePlanner is designed to find a balance between simplicity and functionality, DomuS3D gives designers the flexibility and control to create any type of project they need.
For your professional designers that need to create multiple projects for 3D visualization, getting started with TilePlanner and then moving to DomuS3D could be a good option. If you are interested in learning more about DomuS3D, don’t hesitate to contact us here.
TilePlanner is a great tool for its ease of use and simplicity combined with its incredible power to help your associates and customers visualize design and remodel projects.
If you are looking to learn more about TilePlanner to see how it can work for your business, make sure to check out this page here. And don’t forget to head on over to www.tileplanner.com/en to try out a demo of the tool for your first design.
And if you’re looking for in-depth, how-to instructions on how to build a complete project in TilePlanner, check out our video tutorial and our support website.
If you are a tiling professional and you’re still not sure which design and visualization software is right for you, send us a message. One of our design experts will be happy to learn more about your business to see if one of our software solutions could be right for you.
To receive more information on our products, request a free consultation, or activate a subscription, you can contact us here.